When it comes to creating technical drawings and designs, precision and accuracy are of utmost importance. One key element in conveying information in such drawings is the use of dimensions. In this blog post, we will delve into the concept of the Center Mark for Radius Dimension, a critical tool that helps communicate the size and shape of circular features in engineering and design. We will explore its purpose, how it is created, and its significance in various industries. So, let’s dive in and explore the world of the Center Mark for Radius Dimension.
I. Understanding the Center Mark:
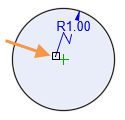
The center mark is a graphical symbol used in technical drawings to indicate the exact center of a circular feature. This mark assists in aligning and identifying the center point of circles, arcs, or cylindrical objects. It serves as a reference point for various dimensions, including the radius dimension.
II. Importance of the Radius Dimension:
The radius dimension is a vital aspect of technical drawings as it specifies the distance from the center of a circle to any point on its circumference. It plays a crucial role in accurately conveying the size and shape of circular features, which are commonly found in objects such as gears, pulleys, and pipes.
III. Creating a Center Mark for Radius Dimension:
To create a center mark for radius dimension, follow these steps:
1. Identify the center of the circular feature.
2. Place the center mark at this exact location, typically with a small crosshair-like symbol.
3. Extend two short lines from the center mark, perpendicular to each other, representing the radius.
4. Add the radius dimension value aligned with the lines, indicating the distance from the center to any point on the circumference.
IV. Use Cases in Engineering:
The center mark for radius dimension finds extensive use in various engineering disciplines. Let’s explore a few applications:
1. Mechanical Engineering: In mechanical engineering, this dimensioning technique is employed to specify the size of gears, shafts, and other rotating components. It ensures proper alignment and functionality of mechanical systems.
2. Civil Engineering: In civil engineering, the radius dimension is crucial for accurately representing curved structures such as bridges, arches, and roads. The center mark helps identify the center point for construction and measurements.
3. Electrical Engineering: Circles and arcs are commonly encountered in electrical schematics and circuit diagrams. The center mark for radius dimension assists in indicating the size and location of components like connectors and switches, aiding in proper installation and maintenance.
V. Best Practices and Standards:
To ensure consistency and clarity in technical drawings, adhering to established standards is essential. Here are some best practices related to the center mark for radius dimension:
1. Use a distinct symbol: Consistently using the same symbol for center marks across different drawings enhances readability and understanding.
2. Proper placement: Position the center mark and dimension lines clearly, avoiding clutter and overlapping with other features on the drawing.
3. Dimension labeling: Clearly label the radius dimension, preferably with a consistent format, such as placing the value above or below the dimension line.
VI. Advancements in CAD Software:
With the advent of computer-aided design (CAD) software, the process of creating center marks for radius dimensions has become more streamlined and efficient. CAD tools offer automated center mark and dimensioning features, reducing manual efforts and ensuring accuracy in technical drawings.
Conclusion:
The Center Mark for Radius Dimension plays a critical role in accurately conveying the size and shape of circular features in technical drawings. Its significance spans across various engineering disciplines, including mechanical, civil, and electrical engineering. By following best practices and utilizing CAD software advancements, engineers and designers can create precise and informative drawings. So, next time you encounter a circular feature in a technical drawing, remember the importance of the Center Mark for Radius Dimension and its role in ensuring accurate communication of dimensions. We would love to hear your thoughts and experiences with this dimensioning technique. Feel free to leave a comment below!
[Word Count: 632]
Center mark for radius dimension – Autodesk Community …
Jan 29, 2002 … The point will not plot since it is on layer defpoints. If you still need to have it completely removed you have two choices, one is to do the … – forums.autodesk.com
Center mark for radius dimension
Autocad Diameter Dimension Two Arrows I want two arrows on diameter dims in Autocad 2010 – AutoCAD 2D … You can force two arrows with the Draw dim line between extension lines checkbox on the FIT tab of the Dimension style and/or make a child … www.cadtutor.net Forcing a diameter dimension with – drawspaces.com

Show Center Marks in Radius Dimensions
May 20, 2022 … Solution … In the Dimension Style Manager, select the current Dimension Style (DimStyle) and click Modify. You can now begin modifying your … – www.landfx.com

Radius dimension with Jog include center mark and jogged linear …
Feb 22, 2016 … This could work by right click on the appropriate extension line and choose Add Jog, which could then be manipulated like an Ordinate dimension … – forums.autodesk.com

Extension lines for a radius dimension need to start at the center …
Actually ReMark, ACAD will place a center mark for you with the radial dimension, just make sure you have it selected in the “Symbols and Arrows … – www.cadtutor.net

Solved: DIMSTYLE Center Marks not shown – Autodesk Community …
Jan 23, 2019 … Solved: I cannot get center marks to show when I create a radius dimension. 1) DIMSTYLE is not available in the ribbon under … – forums.autodesk.com

AutoCAD for Mac 2023 Help | About Creating Radial Dimensions …
Radial dimensions measure the radii and diameters of arcs and circles with optional centerlines or a center mark. – help.autodesk.com

Move Centerpoint of Radius : r/SolidWorks
Jun 4, 2019 … Foreshorten the radius dimension. Right click the dimension > Display Options > Uncheck Center Dimension. … Mark them NTS! PS. I totally thought … – www.reddit.com
Document Properties – Radius Dimensions – 2021 – SOLIDWORKS …
… Dimensions > Document Properties – Radius Dimensions. Compass · SOLIDWORKS Help … Document Properties – Centerlines/Center Marks · Search ‘Document Properties … – help.solidworks.com
AutoCAD 2022 Help | To Work with Radial Dimensions | Autodesk
Create a Jogged Radius Dimension. Click Annotate tab Dimensions panel … Center Mark · To Work with Linear Dimensions · To Create an Angular Dimension · To … – help.autodesk.com

Dim | Rhino 3-D modeling
The size of the centermark for radius and diameter dimensions. Centermark style … A cross mark is drawn at the center of the radius or diameter. Mark and … – docs.mcneel.com